Multitouch is AWESOME! It's the same stuff that's had limited appearance in Apple Macbooks (the two finger scroll option), but it's already in Apple's upcoming iPhone...
Thursday, January 25, 2007
Monday, January 22, 2007


Monday, January 15, 2007
Made it!
I survived the bladesmithing seminar! 30+ hours of work, a ton of mistakes and setbacks that were valuable learning experiences... Tuhon Tom Kier helped impart knowledged that led to 12 razor sharp blades of various styles. I think we all did very well, and he said it exceeded his expectations for a bunch of bladesmithing newbies!
Here's me with the finished blade. It's still quite flawed, but razor sharp... and there's only one in the whole world like it. I'll make the sheath sometime this week or next... didn't have time to make it this weekend. I might even make the sheath out of white kydex...
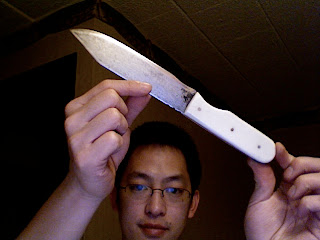
A better photo will be forthcoming... :)
Day Two: The knife takes shape...
Too tired... but blogging must go on... :)
The knife is polished, heat-treated, and tempered... all that remains is the Corian scales, sharpening, and making a sheath....
Passing out.... will write more tomorrow.
The knife is polished, heat-treated, and tempered... all that remains is the Corian scales, sharpening, and making a sheath....
Passing out.... will write more tomorrow.
Saturday, January 13, 2007
Oh, beautiful pain....
Today was the first day of the bladesmithing seminar... and boy am I exhausted. There's a reason why all the old paintings and photos of Blacksmiths all have the massive physique of Hephaestus of mythology... It's a lot of physical work!
The day started off with a quick overview of basic blade anatomy, design, and purpose, as well as an overview of the various steps we'd be taking towards successfully fashioning our own blades by the time 30 hours was up. Then it was off to the homemade forge that was set up for us!
I had in mind a nice mini barong design, which immediately was discarded when I burnt the first piece of steel by overheating it and had to start over with another one. So I opted to make a much simpler clip point knife. I didnt' have much experience in this thing, so I guess it was inevitable once reality settled back in. Nobody makes Excalibur on their first try! :)
Two things I'm happy about... I didn't burn myself, and I didn't cut myself... luck was certainly part of it, but a lot is owed to Tuhon Tom Kier's expert instruction and in my case, assistance, as my blade was rather crooked due to my poor skills with the hammer and anvil. He straightened the poor thing out in like 2 minutes, as I watched in awe how easy he made it looked.
The rest of the day was spent on laborious filework, profiling the blades bevels and edges and trying to make things as symmetrical as possible. I was so involved with it that I ended up skipping lunch. We had a belt-sander, a small Ryobi 4x36 rotary/disc model, that helped speed things up considerably, but the final shaping of the secondary edges required filework. I'm kind of glad that I got a chance to test out that Ryobi, as it was something I was considering getting before... now I'm pretty sure it'll be a purchase in the near future.
I didn't bring my camera, and I'm too exhausted anyway to go outside the hotel to my car to get my unfinished blade, but suffice to say it's still a bit ugly with some more smoothing and filing and sanding to get it looking more even.... but it still looks close to a knife at least! :)
More to come tomorrow!
Friday, January 12, 2007
Sleepy Town
Well, here I am in White Haven/Drum/Blakeslee, Pennsylvania, depending on which map you look at and who you ask. :) After a smooth 2 hour drive from NYC, I'm now here in the Comfort Inn - Pocono.
I haven't been out driving from the city in a long while, and doing it during daylight hours really helped. When I went out to try to find a way to a local Arby's, I had a hard time getting around, because I wasn't used to it being so dark! Made a few wrong turns, and if not for this trusty GPS, I'd be screwed.
NYC is the sort of place that you could theoretically drive around with no lights on at 3am and still be able to get from point A to point B with little difficulty (if not for the cops!). Out here in the Poconos, it gets pitch black really quick, and no lights = death. And missing an exit or turn sucks because it's about 6 to 10 miles between exits.
Heh... reminds me of Indiana.
Anyway, I'm settled into this nice little hotel. Yay for high-speed wifi to keep me in touch with everything! It's time to get ready from tomorrow, the beginning of the bladesmithing seminar I came here for!
Monday, January 08, 2007
Hands dry in less than 10 seconds!
I love these super powerful Xlerator dryers... here's a link to what I'm talking about.
http://www.exceldryer.com/products/xlerator.asp
http://www.exceldryer.com/products/xlerator.asp
Kydex Madness
Quite a number of you might have been wondering what I've been up to, as I've hardly updated my blog in the last few months... I'm getting into bladesmithing, slowly but surely. Starting this month I'll be taking a Bladesmithing seminar with Tuhon Tom Kier of the Sayoc Kali International Group up in the Poconos this weekend, and then following up on it in the next few months, I'll be taking the Creative Blacksmithing course at the School of Visual Arts in NYC.
But before I get into dealing with the sharp stuff, I thought it might be rather cool to try my hand at sheathmaking... the easiest of which seems to making them out of Kydex. Kydex is a thermoplastic that's easily shaped after being heated, and makes sheaths that hug the tool and provide for a solid fit and retention. I didn't have any sharp knives yet to sheath (don't trust myself yet with that), but I do have aluminum trainer knives that I use during Kali classes at PMA. The pictures you see are the steady results of a few months worth of experimentation.
 Here's the first sheath that I successfully made. It's a small sheath designed for one of the mini trainers designed to simulate a folding knife or small tactical. As you can see, the cell texture is pretty burnt or distorted on the surface, as I didn't have a good sheath press and also overused the heat gun. The Kydex kit and the premade belt loop are from Knifekits.com.
 A rear view of the first knife sheath. I used Chicago screws to secure the premade belt loop.
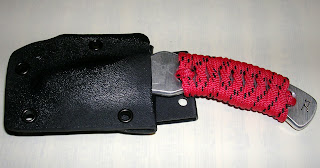
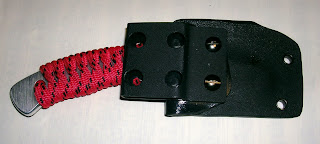
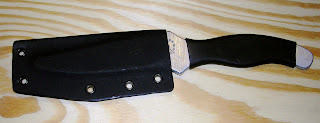 This is the second sheath I made, for one of the larger trainers... obviously this is not one of the Sayoc trainers, though I'd like to modify it to something similar by swapping the heat shrink tubing handle for a paracord wrapped one. That'll be a future project. :) I'm particularly proud of how this one turned out...
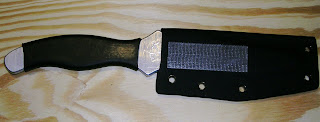 Rear view of the sheath. The sheathpress I used from Knifekits.com really helped with the shape definition. The tape you see is 3M Dual-Lock self-mating tape - basically Velcro on steroids. I use it to attach to either a Dual-Locked Tek-Lok or belt loop/panel.
 Eventually, I thought I'd try my hand at tackling making a double backsheath for the Sayoc training rig, as I frequently have my mini-trainers drop out from it... I've tried screws and I've tried cable ties with mixed results. The middle three rivet holes of the sheath were designed to attach to a Tek-Lok belt clip. However, trying it out during a training session made for mixed results. The way I folded it over still made it a bit loose, and it was difficult to get a positive feel for the angle that I needed to resheath it. Also, because it was a single piece construction, it was difficult to make adjustments, because the heat would mess up the other parts when I attempted to tighten one side or the other. Some suggestions and feedback from my fellow training partners yielded better results in the next project.
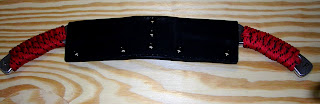
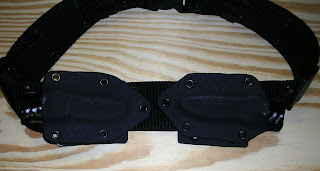
 This is my improved backsheath system. Originally, I had a small riveted strip connected by screws in between both sheaths, but it turned out to overcomplicate things. If you look carefully, I've had to engrave "L" and "R" on my mini-trainers now because while the overall dimensions of each blade (they're handmade and hand ground by Edges2, I believe...) are remarkably consistent, there is just enough variation to throw off the fit of the kydex sheath if a different one was inserted.
 Here is a the same view of the system without the trainers. You'll notice that I've added a small section near the sheath's opening to help guide the blade in and out. Also, notice that the shapes are uneven... ha ha. I "freehanded" shaping these, and perhaps next time, I'll try using some sort of template to make it far more consistent.
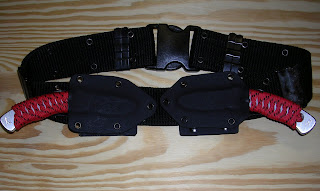
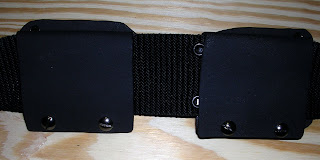 A rear view of the large belt loop panels I use to secure the system to the 2 inch belt. Once again, the awesome Chicago screws save the day. :) On nicer versions, I probably would still prefer to use Tek-Loks.
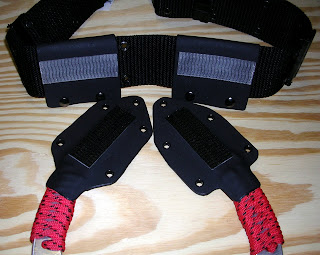 The backsheath system opened up. Inspired by Mr. Justin Garvey's use of 3M Dual-Lock for his Sayoc Tribal Drop Point knife carry system, I also used it to hold things together and make the system more modular. You might be wondering why one side is white Dual-Lock and the other side is black Dual-Lock... I wish I had a fancy artistic answer, but it's simply because Target ran out of black colored Dual-Lock tape. :P
Thanks for reading. :) It's becoming a steadily more serious hobby of mine. I'll be posting more pics ands projects in the future.
But before I get into dealing with the sharp stuff, I thought it might be rather cool to try my hand at sheathmaking... the easiest of which seems to making them out of Kydex. Kydex is a thermoplastic that's easily shaped after being heated, and makes sheaths that hug the tool and provide for a solid fit and retention. I didn't have any sharp knives yet to sheath (don't trust myself yet with that), but I do have aluminum trainer knives that I use during Kali classes at PMA. The pictures you see are the steady results of a few months worth of experimentation.
 Here's the first sheath that I successfully made. It's a small sheath designed for one of the mini trainers designed to simulate a folding knife or small tactical. As you can see, the cell texture is pretty burnt or distorted on the surface, as I didn't have a good sheath press and also overused the heat gun. The Kydex kit and the premade belt loop are from Knifekits.com.
 A rear view of the first knife sheath. I used Chicago screws to secure the premade belt loop.
 This is the second sheath I made, for one of the larger trainers... obviously this is not one of the Sayoc trainers, though I'd like to modify it to something similar by swapping the heat shrink tubing handle for a paracord wrapped one. That'll be a future project. :) I'm particularly proud of how this one turned out...
 Rear view of the sheath. The sheathpress I used from Knifekits.com really helped with the shape definition. The tape you see is 3M Dual-Lock self-mating tape - basically Velcro on steroids. I use it to attach to either a Dual-Locked Tek-Lok or belt loop/panel.
 Eventually, I thought I'd try my hand at tackling making a double backsheath for the Sayoc training rig, as I frequently have my mini-trainers drop out from it... I've tried screws and I've tried cable ties with mixed results. The middle three rivet holes of the sheath were designed to attach to a Tek-Lok belt clip. However, trying it out during a training session made for mixed results. The way I folded it over still made it a bit loose, and it was difficult to get a positive feel for the angle that I needed to resheath it. Also, because it was a single piece construction, it was difficult to make adjustments, because the heat would mess up the other parts when I attempted to tighten one side or the other. Some suggestions and feedback from my fellow training partners yielded better results in the next project.
 This is my improved backsheath system. Originally, I had a small riveted strip connected by screws in between both sheaths, but it turned out to overcomplicate things. If you look carefully, I've had to engrave "L" and "R" on my mini-trainers now because while the overall dimensions of each blade (they're handmade and hand ground by Edges2, I believe...) are remarkably consistent, there is just enough variation to throw off the fit of the kydex sheath if a different one was inserted.
 Here is a the same view of the system without the trainers. You'll notice that I've added a small section near the sheath's opening to help guide the blade in and out. Also, notice that the shapes are uneven... ha ha. I "freehanded" shaping these, and perhaps next time, I'll try using some sort of template to make it far more consistent.
 A rear view of the large belt loop panels I use to secure the system to the 2 inch belt. Once again, the awesome Chicago screws save the day. :) On nicer versions, I probably would still prefer to use Tek-Loks.
 The backsheath system opened up. Inspired by Mr. Justin Garvey's use of 3M Dual-Lock for his Sayoc Tribal Drop Point knife carry system, I also used it to hold things together and make the system more modular. You might be wondering why one side is white Dual-Lock and the other side is black Dual-Lock... I wish I had a fancy artistic answer, but it's simply because Target ran out of black colored Dual-Lock tape. :P
Thanks for reading. :) It's becoming a steadily more serious hobby of mine. I'll be posting more pics ands projects in the future.

Subscribe to:
Posts (Atom)
